

I had so many problems with these pillows, if I wasn't
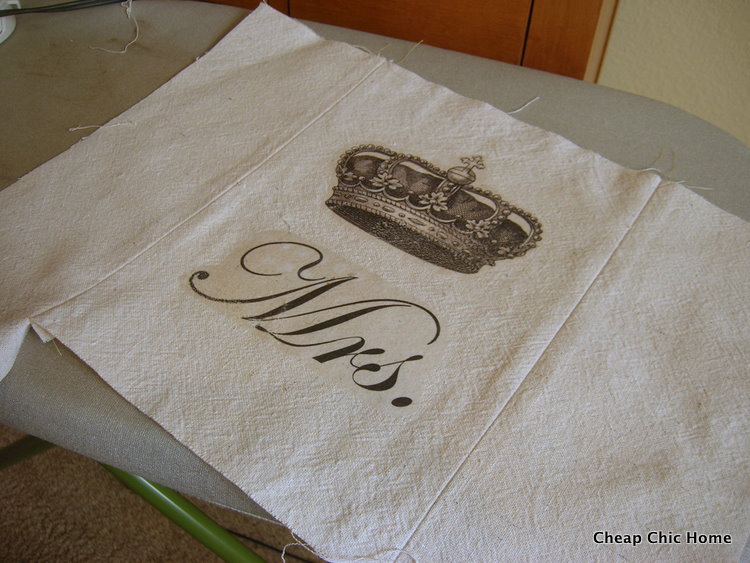
- I found what I'll call his & her crowns at The Graphics Fairy and saved them as .jpg files.
- Next, I made each individual image into a "collage" (in Picasa) so I could manipulate the spacing of the image and text on the screen using 8 1/2x11 crop size.
- Under the crowns, typed Mr. and Mrs. in "masculine/feminine" fonts and enlarged to approximate size of crown.
- Reversed image for printer. On the Picasa Help Forum, I found this info: For a vertical flip, press Ctrl-Shift-V. For horizontal flip, press Ctrl-Shift-H. You must do this from the Library screen, NOT the edit screen.
- Feed paper per instructions. Done.

My goal was to make two 12- x 16-inch (approx.) lumbar pillows. I used the graphics paper-sized in the vertical position and added two end pieces to equal 17 inches. (I realized at this point that I could have cut out the entire size since I was ironing on anyway. It really didn't make any difference in the long run, as I was going to embellish them with trim.)

Make sure seams are pressed open (carefully, if you've transferred the images). I ended up using drop cloth fabric because I didn't want to take any more chances with the linen I had left.

From here on out it was smooth sailing. I added approx. 1-inch trim to the "Mr." over the seams.

Over the top of the Mrs. seams, I used a ruffle. I have done detailed instructions on the ruffles in a prior post. From there, I just sewed the back on, stuffed, and hand-stitched the bottom closed.

I hope you'll agree, they're as cute as can be! If/when I do these again, I'd space the crown and text closer so it's all more centered on the front of the pillow. I may use the flat trim on both, too, as I like the clean lines. I'm also going to try the printer technique again sometime using muslin.
I hope I've inspired, and not discouraged, you!


Super cute - love the ruffle for Mrs.
ReplyDeleteLove these, I did a similar tutorial with rosettes but I can't do ruffles! Nice touch!
ReplyDeletexoxo
Kathleen
Hi Kim,
ReplyDeleteThese pillows are wonderful. I know how stubborn putting images on pillows can be. I have done many through trial and error.
glad you found something that works.
hugs
sissie
I love the pillows. Adorable.
ReplyDeleteThere are cute as can be. I absolutely want them!!!
ReplyDeleteLove, love, love them!
ReplyDeleteI love them! Especially the way one is tailored and the other has the ruffles. Thanks for the tutorial.
ReplyDeleteWow! Absolutely stunning! I'm loving it soooo much.I love the crown graphic on them and the colors are so beautiful... especially the one with the ruffle. You are very talented and creative. Thanks for sharing this inspiring tutorial and for your sweet comment on my treasure chest. Have a lovely week!~Poppy
ReplyDeletehttp://withadashofcolor.blogspot.com/
Kim,
ReplyDeleteThis is a fabulous project! YOur pillows are very chic! I will try my hand at making a pair for myself!
Thanks for the great tutorial.
Yvonne
These are seriously cute. Hopefully the next go-round will be much smoother! I love how you used a ruffle vs. stripes on the different pillows!
ReplyDeleteKim, these are adorable! Love the ruffles, of course, and that you changed them up for His and Hers. Excuse me...Mr and Mrs. :) Such a cute idea. The new couple are going to LOVE them!
ReplyDeleteThese are such fun - and terribly cute too! Thanks for the tips. I am going to be on the lookout for the fabric now.
ReplyDeleteYou definitely inspired (not discouraged) me! I'm happy to get the full details....what did and didn't work....you made it pretty fool proof for us!! The pillows are gorgeous! I love the crowns with the Mr./Mrs. Great idea. The trim detail and color is a beautiful finishing touch!
ReplyDeleteJane
Hi Kim, Thanks for all this information. How did you know that I have been anxious to try this.
ReplyDeleteThis is SO helpful. I've been wanting to try transferring but know that my printer would never print on linen/muslin. So I''m going to look for transfer paper and try this technique. I think the pillows look great!
ReplyDeletelove it :)
ReplyDeleteJust love everything about these pillows! The colours, the graphics, the fabric & especially the ruffle! Beautiful. You have certainly encouraged me. Dropping by from the GF.
ReplyDeleteI LOVE YOUR MR. & MRS. pillows DARN RIGHT ADORABLE. I so want a set. WAY TO GO! winks-jen
ReplyDeleteThese are adorable!
ReplyDeleteLove these pillows! Especially the ruffle on the Mrs pillow....very creative & feminine touch. Great job, thanks for sharing! :)
ReplyDelete