My subtitle is: You Don't Have to Be Crazy to Blog Here, but It Helps! These past few days have been hectic. Those of you with school-age children know that all of the concert, plays, art shows, etc. and their corresponding meetings are happening right about, uh, NOW. As a bonus, I had to come to my mom's last night to accompany her to a minor surgery this a.m. (Thank goodness for WiFi, huh?) It's nice to get a bit of a bloggy break.
Anyway, back to the post at hand. I was ga ga over my pretty mini napkin wreaths and was looking to see if I could find some pretty yellow ones to go with my dresser makeover. I found a pack of "linen" napkins (I didn't realize how thick they were, so had to progress on to Plans B, C and D.)
Never (well, rarely) deterred by being thrown a curve ball, I wanted to think up some things to do with these pretties. You saw my bird try on my last post. They are more difficult to make with paper, because the paper will tear--I know, right. And for the life of me, I can't get the bird feet to make it stand up, so I'm going to work on it/them with fabric when I have more time and more patience.
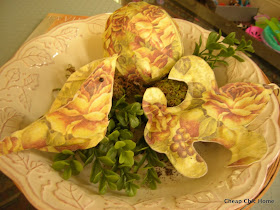
I then moved on to a decorative sphere, first seen:
See it there snuggled between the moss balls. Now, before I hear, or sense, a big collective yawn for yet another sphere, you have to check out the details a little closer. Since these napkins were thick, I could not get them to stick to the plastic sports balls I had in mind. The "Mod Podge" would not hold them down. So, I had to make other plans.
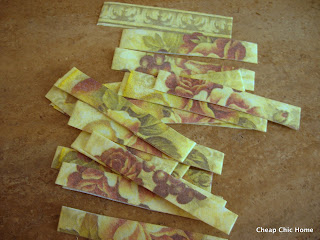
1) Cut the napkin into strips. So far, so good.
SEW the strips together.
This sounds a lot worse that it was, I just kept feeding the end of each strip in to make a big, sewn together strip mass. I think it might be called chaining (I forget from my quilt days.). In the photo above, most of the strips have already been cut apart -- you can see there are four still not snipped apart. After you cut everything, you have one long napkin strip.
Okay, you can yawn now, because all I did at this point was use a straight pin to secure one end to a stryro ball then kept-a-wrapping and secured the last end with a pin.
My last little
Okay, I just {heart} these sachets.
I hope you had a bit of fun with these crazy, napkin crafts.
I soft-focused the edges to draw less attention to Polly Pocket world - wink! I'm hoping, hoping, my next post will be using my grain sack. I'll be linking with these fab hostesses.


I love the sachets! And I love that you shared the creative journey behind getting to them! Sometimes the best ideas aren't the first ones, but the first ones lead to the best ones - huh?! Hope you know what I mean. As always, TFS!
ReplyDeleteThose sachets are great! Love this idea...thanks for inspiring.
ReplyDeleteCuteness!!!
ReplyDeletelove this idea and this blog!! so cute!
ReplyDeleteYou are one creaative cutie!
ReplyDeleteHappy Wednesday!
Cathy
Great job..
ReplyDeleteThanks for joining Get Your Craft on Thursday at Life As Lori. Please join me next week for another great party.
Love, love, love anything fleur de lis. This is such a great idea.
ReplyDeleteI found you via Strut- Your-Stuff Thursday and I'm so glad I did. I will be making this project for sure.
Visit me sometimes over at Pittypat Paperie. Diane