And again, all dressed up for the holidays - don't they just seem like they were about five minutes...and ages ago?
...and just last week!
But, you haven't seen how her journey began... I needed something for the l-o-n-g wall that spans my family room and kitchen. Height was an important factor, too.
The Mr. Craig hunt was on! My requirements were an open top and an open bottom. Hopefully with some French-inspired lines. This is how she looked when I adopted her... I did find her on Craigs List, but by the time I e-mailed the seller, she was donated to S.P.A.R.C.C.s, so I had to drive down to Sarasota with the Strapping Lad.
Yikes! In this photo she looks 1980s country. After a couple of trys, we were able to fit her like puzzle pieces into the back of the van - never a dull moment with Cheap Chic Mom!
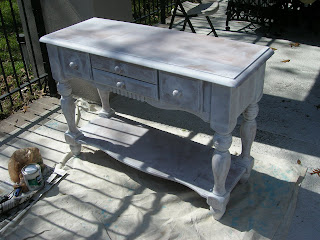
Since you already know I don't much care for a lot sanding, she got a couple of coats of bonding primer (I used Sherwin Williams'). Then, I painted some of the edges with an acrylic red paint.
Hmm, for some reason I didn't take the knobs off...
It always looks worse, before it looks better! Darling Husband removed the wine rack grid for me - it wasn't too bad of a job - it was just nailed in.
After it got a couple of coats of flat black paint, I sanded down the edges a bit where I had painted red, I also sanded around the knobs a bit, as if it were naturally worn. I was going for a layered paint look, so I got white (primer) and red (acrylic) underneath the black.
To finish it, I dipped a cloth in paste wax and walnut stain to get even more layers... I wanted an open bottom so I could put large sized baskets underneath for pretty storage. You can see (below) how I have those baskets full. Well, maybe another post...
The rest is hutch history!
I'm linking with the talented Miss Mustard Seed, check out the other links:


Love it!! What a transformation! Love how the whites and yellows really pop against the black. Saw your teen room too on The DIY Showoff--well done!!
ReplyDeleteIt is beautiful!!
ReplyDeleteLove how it turned out and you have it decorated so nicely too!!
That looks so nice. I'm on the look out for something similar for my kitchen. I'll have to check out Craig's list. Again, great job.
ReplyDeleteOh, I have hutch envy!! You've done a lovely job. Your hutch is gorgeous :)
ReplyDeleteBlessings!
Gail
WOW...she is looking good after her makeover! I luv how you dressed her up. I have never used BONDING PRIMER...thanks for the tip:) Be sure to come by next week for the BIG NEWS at COASTAL CHARM!
ReplyDeleteBlessings,
Linda
Hey Kim, I transfered because I wanted a more customized look. I am an amateur html changer at best. And I felt like I had taken the minima format as far as I could go and it just didn't look very clean. I actually asked Steph of Somewhat Simple who did her blog design and she told me about the site. It was the perfect step between paying for a professionally designed blog and getting a more professional look.
ReplyDeleteThe nice thing is that I don't have to change html to get the look I want, it has the template, and colors all there and ready to go in your layout options. The only issue i have had is organizing the sidebar. For some reason you can only move items to the top two boxes and so if I want to add anything it is a bit of a hassle. I am not sure if this is because of my other html tinkering, or what. I have found if I want to change anything a sidebar box I have to do it through quick edit on the home page, in order for it not to automatically move to the top... which may not make sense until it happens to you!
Good Luck! I hope that helps
Cassity
If you have more questions just let me know! I emailed you but for some reason it failed sending, so I hope this is okay to just leave a comment! BTW the hutch looks great!
awesome job! Lovin' the black!
ReplyDeleteKim you are just an inspiration. I love it. So worth a drive and some paint.
ReplyDeleteCha Cha
What a fantastic makeover!
ReplyDeleteWarm blessings,
Spencer
Just gorgeous - hard to believe the before belongs to that after!!!
ReplyDeleteHutch-tastic is right!
ReplyDeleteVery impressive! She is just perfect!
ReplyDeleteKim, the hutch looks so pretty. Black can sure transform a piece!
ReplyDeleteDid you mix the stain with the wax? I haven't been loving my wax lately which I usually mix with universal tints.
ReplyDeleteYour piece looks amazing!!!
Coming from Miss Mustards site. Just found her. That is one good looking hutch! You really brought it back to life.
ReplyDeleteIt looks so pretty...way better than when you found it!!
ReplyDeleteI LOVE it! So beautiful! The black is perfect too. Thanks for sharing this.
ReplyDeleteIt's a beautiful piece, Kim! I love it in the black and I'd love to see your baskets on the bottom. : ) I love the open top and bottom.
ReplyDeleteGOOD job! Way prettier!
ReplyDeleteBe sure to visit my blog..we are hosting a give away Tuesday, Feb. 23rd!
~Bridgette from All Thingz Related!
Nice job! I'll have to try the bonding primer too.
ReplyDeleteOH! Kim,
ReplyDeleteThat is a remarkable make over! It did look real country and it is Magnificent!
smiles, alice
Kim, It looks really great in the black. Totally makes the 1980's go back where it belongs. Nice work!
ReplyDelete