
Hi, It's me, Jan, from Bobbypin's Boardwalk. My friend, Kim, from Cheap Chic Home asked me if I would be interested in coming out of my blog retirement long enough to do a guest post for her. (Apparently she has something VERY important in the upcoming week or so). I told her that I would be honored to do so, particularly since I love her blog! I happened to have a project that I had worked on and never posted, yet had photographed (what are the chances?) and I really loved it, so I think that is the perfect thing to share on Kim's blog. It's CHEAP, CHIC, and hanging in my HOME.
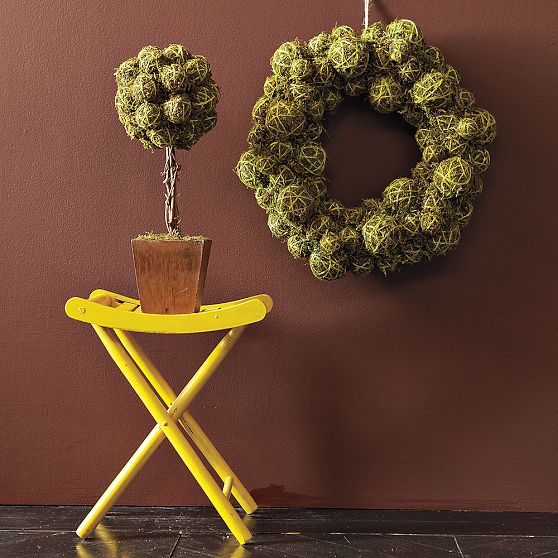
Here it is -- a picture of a wreath that I fell in love with months ago from West Elm (now discontinued). I was impressed by the earthiness and non-feminine look of this wreath. It seemed very versatile and leaned a little more toward a simplistic and modern design style. So.... well -- West Elm! And the fact is -- I wanted it!

You know when a crafter wants something, they NEVER buy it -- oh no -- they have to figure out how to make it, otherwise where is the fun and sense of accomplishment? If you want to make it too, here's how I did it!
- A grapevine wreath
- Green moss - 2 bags (from Hobby Lobby - use the 50% off coupons)
- Various balls (styrofoam, ping-pong, old Christmas ornament balls)
- Twine
- Hot glue/glue gun
Here is my bag of green moss.

Here is my ball of twine.

Here is my box of various balls.

And here is my grapevine wreath

1. Take a ball, apply hot glue to half of the ball. Press on the moss (use caution against glue burns). Once cool, apply more glue and more moss. Then take a minute or so to really press that moss against the ball. This will allow the moss to flatten a bit against the ball, allowing the twine to be more visible.


2. Then wrap your twine around the ball without following any particular pattern. I recommend you put a bit of glue at the beginning of my twine, then wrap and wrap until you like the look of that ball, cut the twine and apply a bit more glue to hold the twine in place.


3. You can then generously apply more glue (where the twine began and ended) and glue your ball to the wreath, sprinkling in a bit more moss in any uncovered areas as you go along.


4. Just keep doing this and doing this and doing this (haha)


In no time at all (well in my case a couple of weeks), you will have an exact replica of the West Elm Wreath.
Then do not go back and look at the wreath on the West Elm site again because you will then discover that it's on clearance for $24.95, and you will wonder why you worked so hard making it when you could have bought it. However, remember that at the time you originally saw it and fell in love with it, it did cost $49.99.


This wreath cost approximately $10 for all supplies -- although I did have about half of the balls on hand. Here are a few pictures of my wreath displayed over my fireplace on a mirror, which I partially de-mirrored so that you can see the brick coming through in various places.
I hope you enjoyed this tutorial. I know I really enjoyed sharing it with you and who knows? Perhaps I'll begin to post on my blog on occasion. We recently put our home for sale and I've spent a lot of time staging and organizing and finishing all those projects that were on the back-burner. Although now that it's so dog-gone clean and organized, I would almost hate to leave it. :)
Kim thank you for the opportunity to visit all my friends again and congratulations on the big event. I know it will be fabulous!

Blessings till next time...
Does Jan have style, or what? Thanks for bringing your moss, glue gun and other supplies over for the day. Please leave a comment to let Jan know how much you miss her!
WOW!!! Jan, you did a super fantastic job! You already know that I miss your blog!
ReplyDeleteOh, it is so good to see you back in blogland! I so miss you and all of your creative projects! This is a beautiful example of your talent. Great job Jan! Come back! I miss you so!
ReplyDeleteI haven't seen your blog but I love this project. It's a wonderful wreath. A fun thing to do.
ReplyDeleteI love unique wreaths. It drives my neighbours crazy because they can't find them in the local stores. I am "pinning" this one for the near future.
ReplyDeleteThanks so much.
Hi!
ReplyDeleteI am your Follower.
Wow! This wreath looks STUNNING!
I really like your blog! Great posts!
Keep up the good work!
Do visit my blog too and follow it if you like it!
Have a Nice day, God Bless!
Alia
http://aliascreativelife.blogspot.com/
Awwww -- hugs to you all. Thank you for the sweet comments; and thanks to Kim for inviting me to post on her blog. It was a lot of fun!
ReplyDeleteJan, come back! You have such cool tutorials!!! I like this one a lot, a lot!
ReplyDeleteJan!
ReplyDeletethis wreath looks so great. It is just like you to come up with such a great project-- really out there. (Just deciding which West Elm piece to Do-over...has me stumped)
Loved your craft and tutorial-- and most of all that sense of humor of yours!
Miss seeing you blog regularly-- but I keep an eye out for you when I can see ya...
take care, Pat
Love your project, Jan! It has great texture and a fun natural look! So nice to have you back!
ReplyDeleteLove, love, love it! Jan is an amazing artist and I am so glad you got her to share something with us again. Encore!
ReplyDeleteAçI do miss you Jan! I cant even read your past posts.
ReplyDelete